|
VCA for music synthesizers. 
This VCA (Voltage Controlled Amplifier) is suitable for both audio and control voltage modulation. Based on VCA3+ by René Schmitz. Used with permission.
Construction

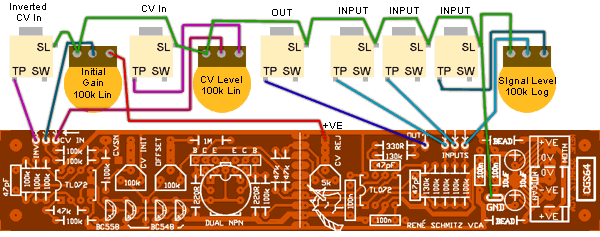
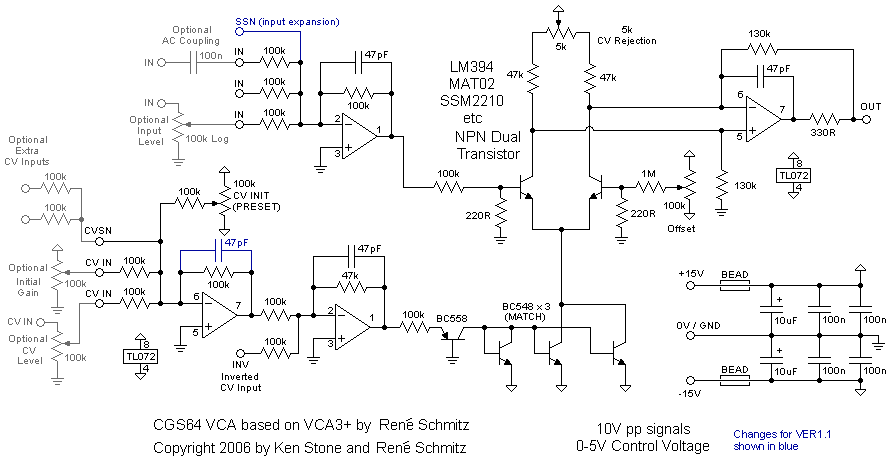
The CV sensitivity is controlled by the resistor between pins 1 and 2 of the CV processing TL072. The specified 47k resistor reduces sensitivity. In order to get unity gain with around a 5V signal, this resistor needs to be increased to around 200k to 220k. The 100k resistor used as the input for the optional initial gain will need to be increased to 330k to 390k to compensate. Alternatively a 200k to 220k resistor could be placed in series with the CW end of the pot. Match the BC548 transistors for the same voltage drop across base emitter junction. On the rear of the PCB are four small square pads, near the TL072 at one end of the PCB. These are for two 100n 1206 (or even 805) SMD capacitors. Put a little solder on one pad. Move the capacitor into position, and re-heat the solder. The capacitor will now be held in place. Solder the opposite end, then go back and tidy up the first joint if needed. The board is designed to take a variety of dual transistors, including 2SC3381, 2SC1583, MAT02, LM394, SSM2210 etc. Set Up Setting up involves adjusting three trimmers. Offset is used to set the DC offset of the output to zero. CV Reject is used to null out the effect of the control voltage on the output. Set initial gain to 0V (fully CCW). Connect a varying waveform of low frequency (triangle wave from an LFO is ideal) into the CV input of the VCA, and turn the associated CV level pot to maximum. Connect the output of the VCA to a control voltage input of a VCO. Monitor the output of the VCO. You should now be able to adjust these trimmers so that there is no modulation present on the output, and the output is at zero volts. Note that these trimmers interact to some extent, so you will need to alternately adjust them until the best result is obtained. On the prototype, CV bleed through was totally eliminated. CV Init is used to set the VCA to zero gain at 0 volts CV input. Feed an audio signal into an input, and monitor the output. With no CV at any of the inputs, and the optional external Initial Gain pot, if used, set to its zero position, adjust this until no signal is heard. Notes:
Parts list This is a guide only. Parts needed will vary with individual constructor's needs. Article, art & design copyright 2003 by Ken Stone |
